Pages

Monday, June 23, 2014

Peace, Love, & Junk!


Over the weekend, I decided to leave the city for a bit and venture out west toward rural Nebraska for a music and antique festival called, Junkstock. It's a 3-day event that happens every year on the fields of an old Dairy farm. Vendors from different parts bring wondrous antiques, vintage finds, and re-purposed items; some which even date back when my grandparents were young! 


As I paid the $5 entrance fee, I saw that there were numerous booths to visit and things to look at that I just had to pick a booth and see what nifty things I could find. 

The Barn & Vendors

Metal Daisies

Vintage License Plates

At one of the booths, they had a table that had a giant sign that said "Speed Zone", two bowling pins, a mini tool organizer, and a silver tray filled with little squared letters. As a child at heart I had to play with the block letters and spell my name!


TA-DAH!

In the middle of the grassy field near the booth I was in I found a live band performing. What was cool about it was that a new band would perform at every hour and you would get a chance to experience new kinds of music like blues, acoustic/folk, and even bluegrass. I really enjoyed listening to the sounds of banjos and guitars, it was refreshing. 


As I continued to walk and play "I SPY" at every booth that I visited, I found a barn that had a giant peace sign, formed of colorful tires! A perfect picture moment to remember.
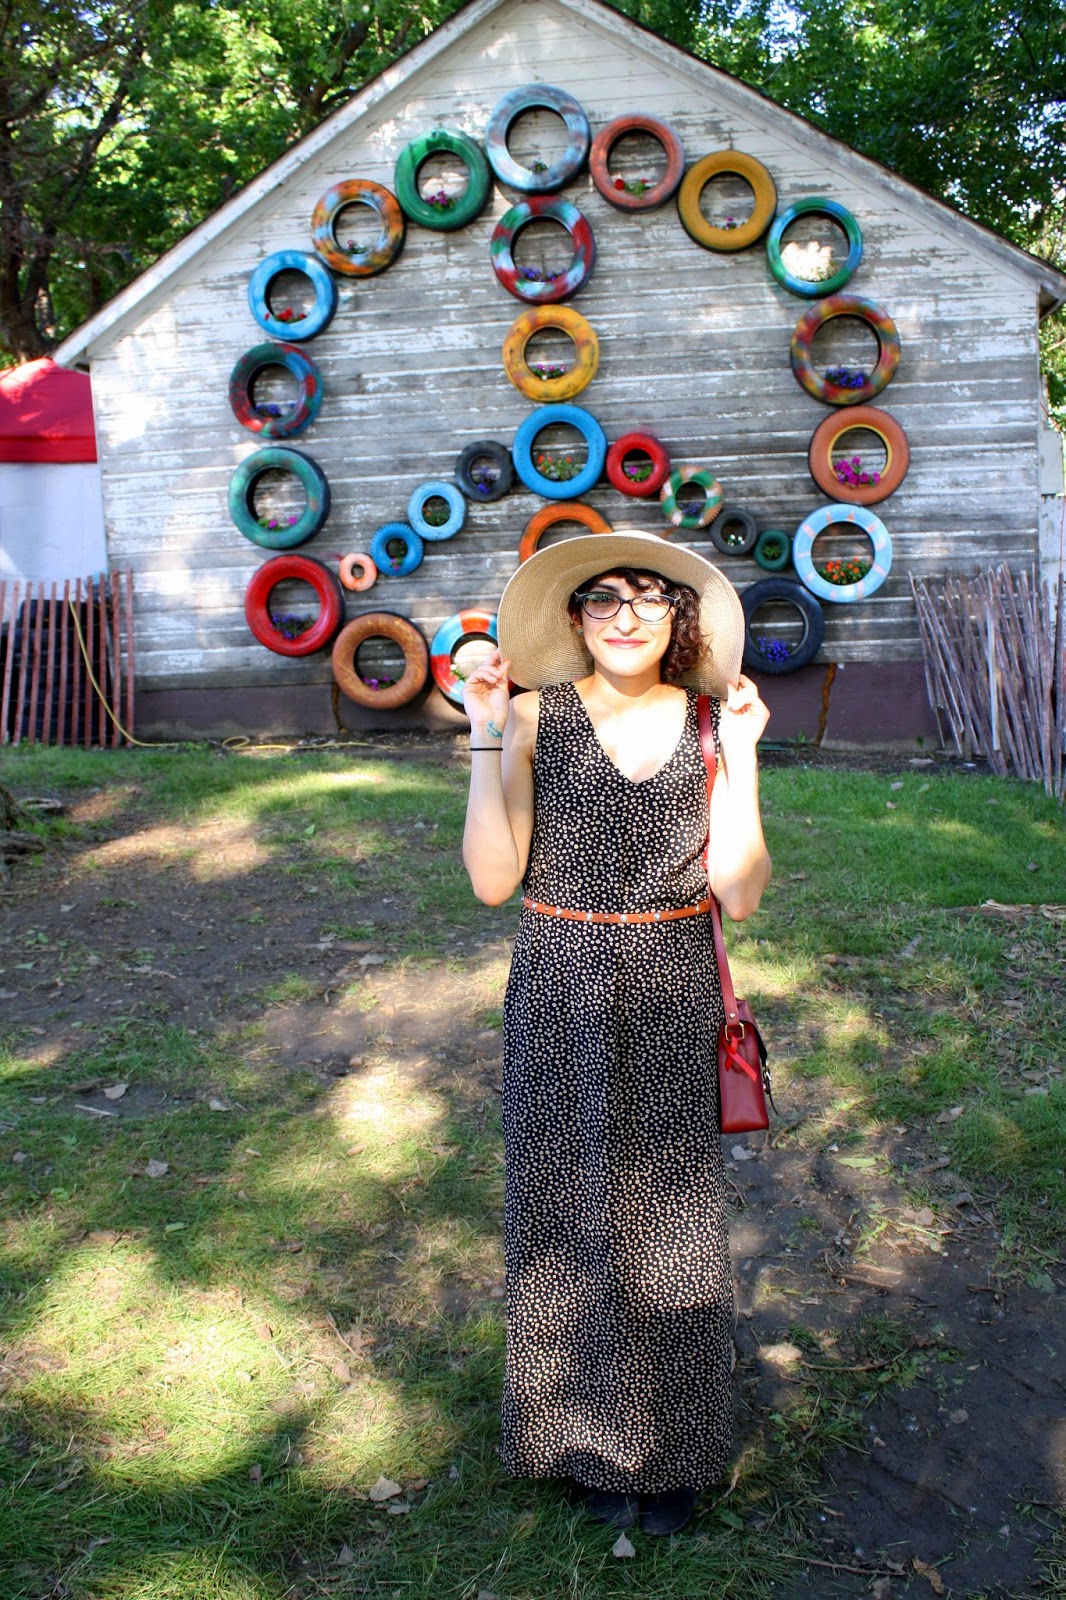

Hat- Goorin Bros.
Bag- Angela & Roi
Shoes- Macy's
Belt- Charlotte Russe 
Dress- Scout Dry Goods


Later on in the day...

I had a really great time at Junkstock and I hope to come back next year. I like the fact that it's 3-days and not just one, since there is so much to look at and little knick-knacks to find. Next time I'll be sure to bring a bigger bag and more money to spend cause you never know what you're gonna go home with!


From LA, With Luv
Fati <3

Tuesday, June 17, 2014

Dress up with Hello Holiday!


 Do you ever have those days where you look in your closet and think, it's time to get new wardrobe? It's times like these where I am grateful we have the internet, where we can browse through and do some serious online shopping. I found this online vintage shop here in Omaha, Nebraska called Hello Holiday.  It was founded by these two lovely ladies, Sarah Lorsung Tvrdik & Megan Hunt. (Photo above)

 For Sarah & Megan opening a mini vintage shop was a dream come true. Their love for fashion, design and of course retro-style has lead them to be Omaha's leading entrepreneurs.

 Twirl Girl Next Door Dress


Here's a quick interview I had with Sarah:

Me: How did you come up with the name Hello Holiday?
SarahMy co-founder Megan and I came up with our name after a few beers one evening at Omaha's Dundee Dell. We honestly just made lists of words that we felt fit our brand -- cheerful, celebratory and never too serious. Hello Holiday just felt right. 

Me: Who is your biggest fashion influence?
Sarah:  I'm greatly inspired by all things '60's, from iconic British fashion to actress Brigitte Bardot. I also draw inspiration from drag culture, Lucille Ball, and a handful of bloggers (Keiko Lynn, Mrs. Lilien and The Cherry Blossom Girl are my favorites). I could go on forever...

Me: If you were to pick one, What is your favorite Hello Holiday piece?
Sarah: Right now, my favorite is our Parasol Dress from designer Dear Creatures. Completely obsessed! We have a new hue in-coming for summer in the same dress, which I'm going to have to snatch up immediately when it arrives!

 Parasol Dress


Me: Any upcoming projects?
Sarah: We're in the process of a big website revamp, launching in the next few weeks! I'm so excited to show everyone Hello Holiday's new look -- along with a ton of site improvements that will make it more user friendly.

One of my favorite items that I saw was the Beach Keen Skirt made by UK designers Emily & Fin! I love the unique design and if you look closely it has mini pin-up girls! Cute huh?

 Beachy Keen Skirt


As summer is coming up (or is here already) it's time to start looking for those cute summer dresses or outfits to take to the beach. So why not dress up with Hello Holiday! I know I will!

Keep in touch:

*Photos courtesy of Hello Holiday.

From LA, With Luv
Fati <3

Tuesday, June 3, 2014

How to Make Your Own DIY Tie-Dye Shoes


Looking for a fun summer project? Try making your own tie-dye shoes!

MATERIALS:
1 Tie-Dye kit, includes: 
gloves
 rubber bands
 3 bottles w/ paint 
1 pair of white Basic Edition flats or canvas shoes
1 Newspaper/Magazine


I bought these Basic Edition flats from K-mart for only $8. They are super comfortable and are 100% cotton. If you don't wear flats you can also use a pair of white Vans or any light colored canvas shoes, preferably made from cotton.

*Prior to starting your project, it is recommended that you wash your item with warm water. This will remove any oils or sizing that may interfere with the dye. 

The first thing I did to prepare was place unused newspaper/magazine on the area that I was going to be working at. Try to avoid places that have dust or dirt. Once that was set, I placed 5 rubber bands on my shoe. These will be the areas where I wanted the paint and the design to show. The rubber bands help to divide the colors and form the tie dye effect. 

Since there were some creases on the shoes I had to lift them to position the rubber band in place. Depending on the shoe, place a tight rubber band for more sustainability.


The colors that I decided to use, which were included in the kit were yellow, blue, and pink (which also looks like red lol). You can buy a one-step kit at Walmart for $10. If you've never seen tie dye paint, it usually comes in a powdery like form. All you have to do is add cold water, pour it in the bottle until it reaches the rim or the designated line, and shake until the powder dissolves. I would suggest that you have your shoes and plastic gloves ready to paint.


When I began painting or dying, I started off with yellow and then continued to add in the other colors. It was a bit difficult to add the paint since it kept slipping, so I just tilted the shoe(s) and with my gloves carefully spread the paint so that it could fill in the white areas. This is how it looks! There maybe be some dripping so be prepared.


Once that was done, I took off my gloves and carefully saran wrapped each shoe and placed them on top of a paper bag or solid surface to dry. The drying process takes about 6-8 hours, you can leave them longer for a more vivid color. 

Since I started this project at night, I had to wait until the next morning to see how they turned out. 

The next day...

I could see that the color had already dried, so I unwrapped the shoes and carefully took off the rubber bands. My next  and final step was to wash and dry my shoes. I added a little bit of soap to the washer and set it to hot. When you are washing your newly tie-dyed items, don't mixed it with other clothes, since the color is still fresh and it might stain.

Once that was done, I put them in the dryer....they are almost ready!!

and

TAADAAAH! My shoes are ready to go!


There are a lot of things to consider when you are tie-dying, like how much color you might want  or when colors mix how is it going to look...etc. But it's cool to see the process and what your end product will look.  

Continue to wash your shoes or tie-dyed projects (t-shirts, bags, etc.) separately.

I hope you all enjoyed this post! If you end up making tie-dye shoes or clothes upload or your photos below!

Happy Blogging!

From LA, With Luv
Fati <3